Editing Command Bar in Model Driven Appswith Power FX 2
This post is part of the Dataverse series.
Component library
In the last Command Bar post we have added a new Power FX Button to the command bar on the Main menu. Now, let’s have a look what we can do in addition.
Open the Solution, in which you have created the new command.
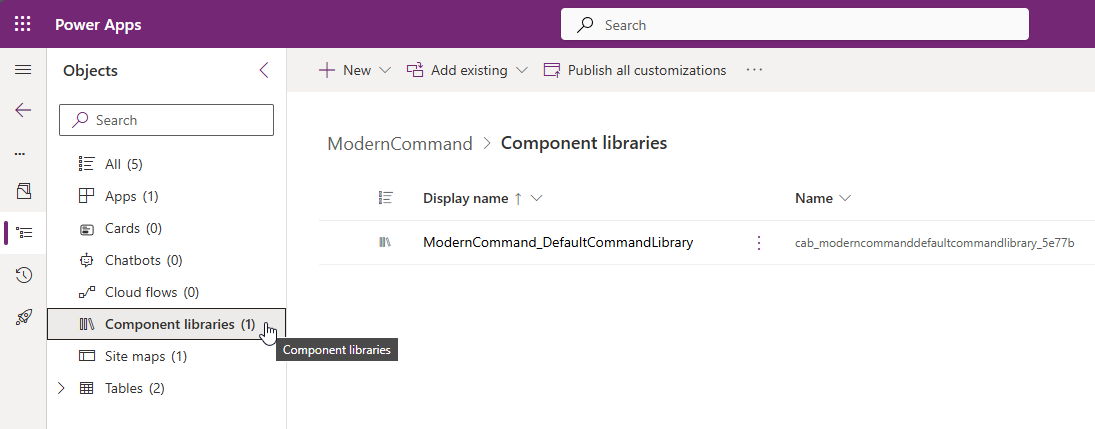
Some new artificats have been added to the solution - we will focus on the Component libraries.
Inside the Component Libraries you will find your new created Modern Command.

Click on the ellipsis (3 vertical dots) for your component and select edit, to open the command editor.
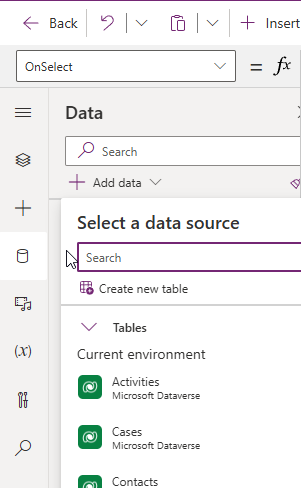
When the editor is opened, you will see in the Formula bar your code. But in this window you also have additional functionality. Especially you can add additional datasources. Therefore, have a look at the left pane, select the data icon and select add data.
Search for e.g., Tasks and add the Dataverse Tasks table to your command.
Command bar editor
Now, let’s navigate back to the screen, where we have created the Marketing command button where we just have added an additional data source:
- Inside your solution
- OPen the Model Driven App
- Navigate to the table (Account) in the left menu
- Click on the 3 dots on Account view and select Edit command bar
- Open the Main form and select the Marketing Button
- Open the formula bar and add the following code before the Notify formula

Patch( Tasks, Defaults(Tasks), {Regarding:Self.Selected.Item}, {Subject:“Marketing Follow up”} {‘Due Date’:DateAdd(Self.Selected.Item.‘Modified On’,7,TimeUnit.Days)} ); - If you like you can adapt the Notify dialog as wwll
- Save and Publish & click Play to test
Let’s have a look at the above code
- As we have added the tasks to the data of the component, we can leverage the information about the task table.
- You can use Concurrent to run multiple formulas synchronous. In my case I will not use concurrent, as I want the Account patch to be finalized. the, the next patch to create Tasks can use the modified on date to calculate the due dtae of the follow up.
- To create a new record in a different table, use
Patch(RelatedTable, Defaults(RelatedTable, {PropertyRelatedTable1:Value or formula},{PropertyRelatedTable1:Value or formula})) - If you want to calculate a date, you can use e.g., DateAdd. In Dataverse there are different types of Date fields available. You can have Only Date, Date and Time, but date fields can also have different Timezone Settings. Unfortunately calculation with
Now / UTCTodayis only supported with Timezone independent setting. Therefore it is better, to use an already existing date field, that has been set already to do the calculation. This is the reason, why I am doing the Patch one after another, so I can leverage the modified on which has just been updated in the previous step.
All parts of this series (22)
- 1. Form Fill Assistance on Columns in Dataverse
- 2. Copilot for Dataverse - New experience
- 4. Copy an existing Model Driven App
- 5. Editing Command Bar in Model Driven Appswith Power FX 2
- 6. Custom Pages in Model Driven Apps
- 7. Editing Command Bar in Model Driven Appswith Power FX
- 8. Dataverse Teams Integration - External Content
- 9. Dataverse Email Integration
- 10. Manage Polymorphic Lookups in Dataverse with XRM Toolbox
- 12. Mapping columns in related Many-to-Many tables
- 13. Mapping Lookup Columns
- 15. Best Practices when working with Dataverse
- 16. Create your own M365 Dev Tenant
- 18. Activate additional languages in Dataverse
- 19. Publishers and Solutions
- 20. Tables and Columns
- 21. Datamodelling in Dataverse
- 22. Introduction to Dataverse
About CRM and Beyond
Jörgen Schladot

Solution Architect
Dynamics 365 CE & Power Platform
@ Avanade Deutschland GmbH
Recent Posts
Tags
Archives


 azure
azure
 copilot
 dataverse
 dynamics365