pac canvas
This post is part of the PacCLI series.
All previous pac posts have been around handling envionments in your tenant and general governance topics which are most likely more important for admins and not for developers or makers. Todays post is different though.
Today we will have a look at
pac canvas
To learn more about this command, as always it is helpful to just run
pac canvas in the terminal, to get more information about possible command options.
With canvas you will have the option to:
- download: Download canvas app as .msapp file
- list: List canvas apps
- pack: (Preview) Pack sources into an msapp file
- unpack: (Preview) Extract an msapp file into sources
- create: Generate a canvas app from a custom connector
Unfortunately, the 2 very interesting commands pack and unpack are still in preview for quite some time now. And even if you might not use them to rely your productive pipelines on them, I would recommend to use them at least for documentation and reviewing code changes as this will help you a lot.
But lets get started first
List
pac canvas list
This has only the option to specify an environment (-env). But if you have selected an environment already with the
pac org select -env GUID command you learned in one of the previous posts, you can just run the command without specifying an environment and you will get the results from the active one.
The result of the list command is a table with all canvas apps in this environment, with information about the creator and the modified date. The command will list all canvas apps, neither they are in a soluton or not.
Download
Once you have an overview, which canvas apps are available, lets proceed with the command
pac canvas download
With download you have 5 different options that you can specify. Environment is only necessary, if you are not using the active environment.
- name (-n): Canvas app exact, partial name, or App ID
- file-name (-f): File name (with .msapp extension). If you do not specify a custom filename, ‘appname’.msapp will be used in current directory.
- extract-to-directory (-d): specify a directory name where the canvas app will be extracted to. The folder will be created automatically.
- overwrite (-o): Allow file overwrite if file already exists
When you are using
pac canvas -d foldername
foldername will be created in the path you are currently located in. When you open the folder in file explorer, you can see some subfolders and lots of .json files.
Unpack
as we have downloaded the .msapp file now, let’s continue with the unpack command
pac canvas unpack
will need 2 additional information:
- –sources will definethe foleder you want the msapp content unpacked to
- –msapp is the path and name of the .msapp file
In my case I have used following code to unpack the filename.msapp in the current directory to a new folder called filenameunpack
pac canvas unpack –msapp filename.msapp –sources filenameunpack
Once the unpack command has run successfully, the folder has been created with several subfolders and json files as well. But the folders and files differ from the ones created by extract-to-directory. The json files look very structured and in addition in the src folder, two yaml files App.fx.yaml and Screen1.fx.yaml have been created. Especially Screen1.fx.yaml (and additional screen files) is the file that I would upload to DevOps source control to have a better comparison between two deployments. This is also a great functionality to review the complete Canvas formula without opening each component in a canvas app., which can be quite cumbersome within the maker portal.
Update on MS Build
Since last weeks MS Build 2024 there is a new functionality, to work with formulas directly, so you do not need the unpack command.
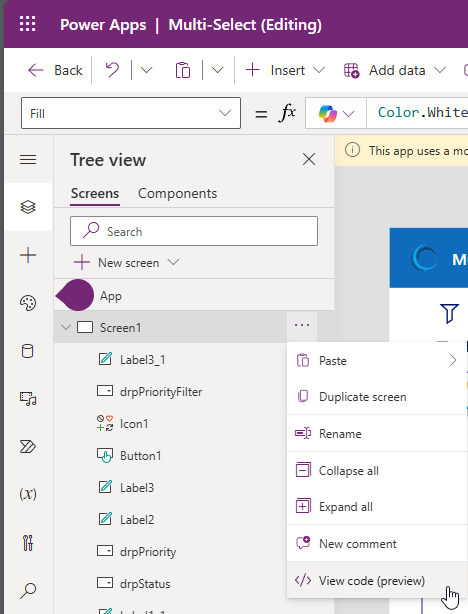
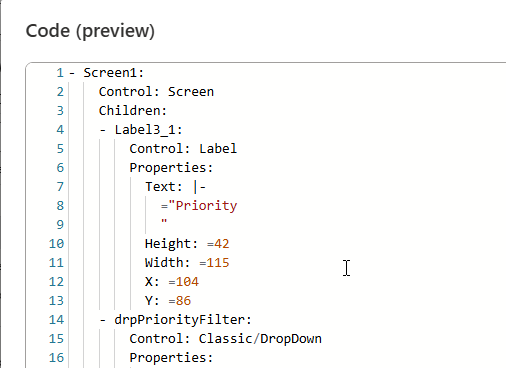
 Within the canvas app, you can click on the 3 dots of a component and select View code
 With this functionality, you have a similar experience as with the pac canvas unpack command.
Nevertheless, with the pack command, you have the complete app, while with the View code functionality you can only copy components. And also information like data sources are missing which are part of the unpacked information as well.
Pack
The opposite command of unpack is pack. As mentioned above, with unpack you create e.g. a Screen1.fx.yaml (instead of screen 1 your Screen name of the first screen will be used) file and other yaml files as well based on the complexity of your app. You can then work with these ymal files within vscode or any other editor. While I do not recommend to write complete new formulas in vscode as intellisense will not work, it might be quite helpful to use search and replace functionality.
Once you have made the changes, you want to import these changes again.
pac canvas pack –msapp filename_new.msapp –sources filenameunpack
You can use above code to create a new file that you can upload to the environment with maker portal. A pac canvas upload command is not available.
All parts of this series (8)
About CRM and Beyond
Jörgen Schladot

Solution Architect
Dynamics 365 CE & Power Platform
@ Avanade Deutschland GmbH
Recent Posts
Tags
Archives


 azure
azure
 copilot
 dataverse
 dynamics365